Saturday, 8 November 2014

Sharing Internet Connection to other devices via Ethernet Cable


To use more than one device at the same time such as 2 laptops, or a laptop and an Xbox, you can connect the second device using an Ethernet cable www.kashim.do.amundefined

Sharing From Windows 7 and Vista (not available on Windows 7 Starter pack) (for Mac click here)

1. Start by opening control panel on the computer accessing the Wifi Signal (make sure you are logged in), which we’ll call computer A.
2. Now click on Network and Internet
3. Then click on Network and Sharing Center
4. On the left hand side click Change Adapter Settings
5. You should then see all the connections set up on your PC. Right click on the Wireless Connection which will be currently connected to the internet and click Properties
6. Now select the Sharing Tab (if this does not appear click here for further instructions), tick the ‘Allow other network users to connect through this computer’s Internet connection’. Then click the drop down arrow and select the Local Area Connection. Now click OK
7. Now plug your Ethernet Cable into both computers

8. Now on the other computer (Computer B), repeat the previous stages 1-4 to view the Network Connections. Right click on the Wireless Connection and click Disable. Make sure the Local Area Connection is Enabled.

Mac

For sharing a connection through a Mac, first make sure the wireless is enabled and you are connected to the Wifi signal and logged in.
Now open the System Preferences by clicking the Apple Icon > System Preferences, and then click Sharing.
You should now see this window:
undefined
Now in the drop down box for ‘Share your connection from’ select AirPort and ‘To computers using’ check Ethernet.
Now check the Internet Sharing box from the list on the left
On the box that appears Click Start
undefined
You should then see Internet Sharing: On
undefined
Now connect the Ethernet cable to your computer
undefined
You can now connect the other end to the device you wish to connect to (computer, Xbox) using the Ehternet cable. Make sure the wireless on the other devices is switched off to use/

Saturday, 1 November 2014

Wifi Tethering / Wifi Hotspot (Hindi)

Basic Networking: Wifi Tethering / Wifi Hotspot (Hindi): Tutorial in Hindi shows How to get wifi tethering on android & Get Free Wifi Hotspot / Tether . Video Shows How To Turn Your Android P...

Bootable usb pendrive using cmd


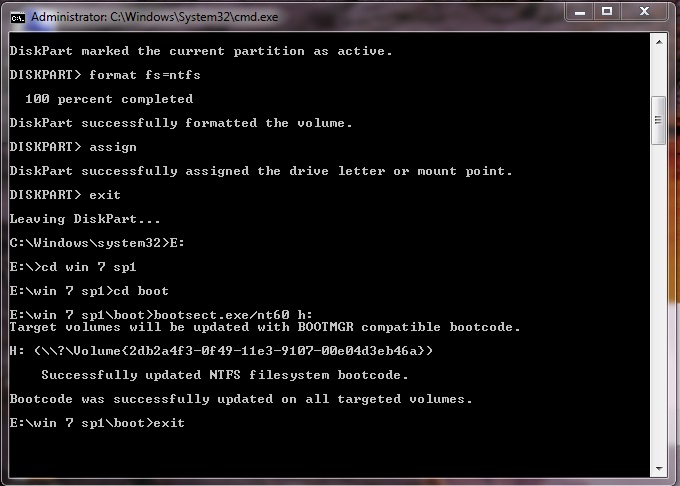
Open CMD by Run administrator
Diskpart
List disk
Select disk  1
Clean
Create partition primary
Select partition 1
Format fs=ntfs quick
Assign
exit

अपनी राय हमे जरूर मेल करे। 

Monday, 27 October 2014

कैसे करें विण्‍डोज 7 में स्‍टार्ट मेन्‍यू को कस्‍टमाइज


आप तो जानते ही हैं कि बिना स्‍टार्ट मेन्‍यू के विण्‍डोज 8 और 8.1 का क्‍या हाल हुआ है, अन्‍त में हार कर माइक्रोसाफ्ट को विण्‍डोज 10 में फिर से स्‍टार्ट मेन्‍यू को लाना ही पडा। आप समझ गये ही होगें कि स्‍टार्ट मेन्‍यू विण्‍डोज के यूजर्स के लिये कितना उपयोगी होता है, इससे विण्‍डोज को यूज करना बहुत आसान हो जाता है, आपके कम्‍प्‍यूटर के सारे प्रोग्राम, माय कम्‍प्‍यूटर, डाक्‍यूमेन्‍ट जैसे आप्‍शन आप आसानी से स्‍टार्ट मेन्‍यू से ही सीधे ओपन कर सकते हैं वैसे तो स्‍टार्ट मेन्‍यू की यह सेटिंग पहले से ही होती है लेकिन अगर आप इसे अपने हिसाब से बदलना चाहें तो आप यह बहुत आसानी से कर सकते हैं, जिससे यह आपके लिये और भी सरल और तेज हो जायेगी -


स्‍टार्ट मेन्‍यू के आयटम को रीनेम करना - 

स्‍टार्ट मेन्‍यू में दिये गये सभी आयटम जैसे माय कम्‍प्‍यूटर, म्‍यूजिक, पिक्‍चर्स जैसे आप्‍शन को आप सीधे-सीधे रीनेम कर सकते हैं, बस उन पर राइट क्लिक कीजिये और रीनेम पर क्लिक कीजिये, इनको आप हिन्‍दी में भी नाम दे सकते है, इसके लिये आपको अपने कम्‍पयूटर में यूनिकोड इन्‍स्‍टाल करना होगा। 

पावर बटन के एक्‍शन को बदलना 

विण्‍डोज 7 पावर बटन दिया होता है, वाय डिफाल्‍ट यहॉ लॉग ऑफ का बटन दिया होता है, लेकिन अगर आप इसे बदलना चाहते है, तो आप अपने टास्‍कबार पर राइट क्लिक कीजिये और प्रार्पटीज पर जाईये, प्रार्पटीज में स्‍टार्ट मेन्‍यू टैब पर क्लिक कीजिये, यहॉ आपको पावर बटन एक्‍शन मेन्‍यू पर क्लिक कीजिये, इसमें कई सारे एक्‍शन आपको दिखाई देगें, जैसे स्‍विच यूजर, लॉक, लॉग ऑफ, रीस्‍टार्ट, शटडाउन, स्‍लीप आदि आप जिसको भी चाहें सलेक्‍ट कीजिये और एप्‍लाई कर दीजिये। 

Recent प्रोग्राम और फाइलों को डिस्‍पले/हाइड करना 

यह आप्‍शन बहुत ही यूजफुल है, इससे वह प्रोग्राम और फाइलें आप सीधे स्‍टार्ट मेन्‍यू से खोल सकते हैं, जिन पर आपने हाल ही में काम किया है, जैसे वर्ड, एक्‍सल, पावर पाइंट आदि, इसके लिये टास्‍कबार और स्‍टार्ट मेन्‍यू प्रार्पटीज में स्‍टार्ट मेन्‍यू टैब पर क्लिक कीजिये, यहॉ आपको प्राईवेसी में दो आप्‍शन दिखाई देगें, इन दोनों पर टिक कर दीजिये।

माय कम्‍प्‍यूटर को बिना खोले डिस्‍क ड्राइव को ओपन करना 


जी हॉ आप सीधे स्‍टार्ट मेन्‍यू से ही अपनी डिस्‍क ड्राइव को ओपन कर सकते हैं, लेकिन इसके लिये आपको स्‍टार्ट मेन्‍यू में आपको हार्डडिस्‍क की डिस्‍क ड्राइव की लिस्‍ट का दिखना आवश्‍यक है, ऐसा करने के लियेटास्‍कबार पर राइट क्लिक कीजिये और प्रार्पटीज पर जाईये, प्रार्पटीज में स्‍टार्ट मेन्‍यू टैब पर क्लिक कीजिये, यहॉ आपको customize बटन दिखाई देगा, इस पर क्लिक कीजिये, यहॉ आपको स्‍टार्ट मेन्‍यू से सम्‍बन्धित सभी आयटम दिखाई देगें, जैसे My computer, Control Panel, etc. इसके साथ साथ आपको यहॉ तीन आप्‍शन और दिखाई देगें-

  • Display as a link, 
  • Display as a menu, 
  • Don't Display this item

तो अगर आप माय कम्‍प्‍यूटर में अपने डिस्‍क ड्राइव की लिस्‍ट या मेन्‍यू बनाना चाहते हैं, तो computer पर दिये गये आप्‍शन में Display as a menu पर टिक कर दीजिये।

virtualbox से एक साथ चलाये windows 7 और windows 8


oracle virtualbox एक ऐसा software है, जो आपको सुविधा प्रदान करता है एक Operating System के अन्‍दर दूसरा Operating System install करने की अौर आपकी windows में  किसी भी software को बिना install किये check करने की। oracle virtualbox आपके Computer के अन्‍दर एक अौर virtual Computer बना देता हैं। तो अगर आप किसी Operating System या software को सीधे अपनी windows में install नहीं करना चाहते हैं तो oracle virtualbox में run कराकर check कर सकते हैं तो आइये जानते हैं oracle virtualbox का setup कैसे करते हैं - 

Step-1 VirtualBox को oracle द्वारा बनाया है आप इसे VirtualBox की site से Free download कर सकते हैं, Site पर VirtualBox 4.3.12 उपलब्‍ध है। आप इसके download कर लीजिये अौर Computer से Install कर लीजिये। 

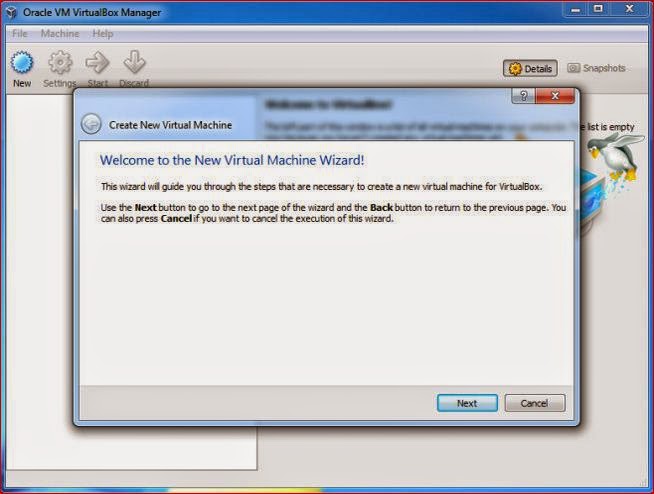
Step-2 जब आप VirtualBox oracle को Run करायेगें तो कुछ इस तरह की Windows Open होगी, यहॉ New पर Click कीजिये, जिससे Virtual Machine Wizard open हो जायेगा। अब Next पर Click कीजिये। 

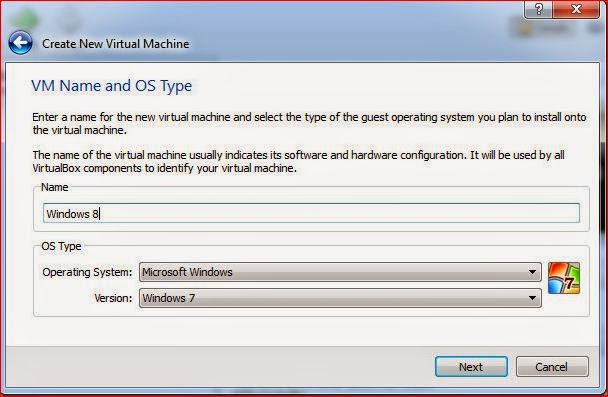
Step-3 अब Virtual Machine या VM Name Type कीजिये या जिस Operating System को आप Virtual Machine में install करना चाहते हैं उसका नाम Type कीजिये। साथ ही Operating System Drop down menu से Operating System भी Select कीजिये। 
Step-4 अब Virtual Machine के लिये अपने system से ram allocated कीजिये। आप अपनी सुवि‍ध्‍ाानुसार कम या ज्‍यादा कर सकते हैं। 
Step-5 अब Virtual Machine के लिये Virtual Hard Disk बनाईयें इसके लिये Create new hard disk कीजिये और Next पर Click कीजिये। 

Step-6 अब Virtual Hard Disk को अपने Computer से sige allocated कीजिये अौर Next कीजिये। 

Step-7 जब यह प्रकिया पूरी हो जायेगी तो तब Virtual Machine कुछ इस प्रकार की दिखाई देगी। अब Windows 7 या Windows 8  Install करने के लिये Settings पर Click कीजिये।  
Step-7  Settings में Storage पर Click कीजिये। यहॉ CD/DVD ड्राइव में अपने Computer से  windows 7 और windows 8 की Disk Image को अोपन कीजिये। 

Step-8 अब Virtual Machine पर जाकर Power on कीजिये अौर windows 7 और windows 8 Install कीजिये। यह बिलकुल किसी Computer की तरह ही काम करता है। जैसे Computer में Windows Install की जाती है वैसे ही इसमें भी की जाती है।